
The Backstabber…
The light meter, a cunning tool and friend that can lead you to great things. But when you rely on it the most, it will turn and stab you in the back. Much like the scorpion and frog, it’s just the nature of the beast. This nature once it’s understood can be harnessed and put to work for you. We will delve into this with some basic tools that you can put in your box and fiddle with on a rainy day, or any day for that matter.
Give it what it wants…
When a light meter is asked to  measure the light off of a given subject it likes to average the subject. It wants to see middle gray, or 18% gray. This gray can be found on a gray card, which can be purchased online or at any local camera shop that is worth anything. These cards come in handy for determining such things as exposure and white balance. An exposure reading can be taken directly from a gray card. This is because if you give the meter what it is looking for then it will respond appropriately. The image to the right was exposed according to the reading given by the card. There is however an over all dark feeling to the image due to the shadows cast onto the building. But since the meter was given what it was looking for those shadows were appropriately exposed. Keep in mind that everything is relative, more on this later.
Things such as white balance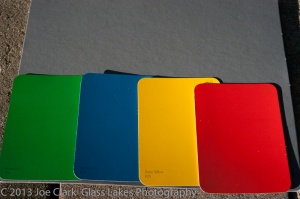 can also be determined in post production by the use of a gray card. In the examples above and below the card was placed into the scene and exposure was set to it. After the images were downloaded into Adobe Lightroom I selected the develop tab for the image with the card in it. The custom white balance was then set from the gray card using the dropper. For a more scientific mindset a gray card is a constant, it reflects a constant amount of light relative to the amount that falls upon it. It is also a known color, and value. So placing it into scenes where there is an unknown amount of illumination will assist in determining the proper exposure and color of light at that particular scene. This is particularly helpful because there is always change occurring in the amount and color of the light as we move from place to place. However there are known color temperatures, and best guesses for situations of direct sunlight, shade, and even florescent lighting. But to keep on the safe side the use of calibration equipment should be used.
A little historical information…
The gray card is the center of an exposure system developed by Ansel Adams called “The Zone System” (links go to the wiki pages for further reading). Ansel Adams is highly regarded as one of if not the best photographer to have ever walked the Earth. The man was a scientist with a camera, he strove for perfection in every image that he shot. He knew the math, the physics, and the chemistry to create stunning work. One of the most remarkable stories would be associated with his photograph “Moonrise“. For this image he literally pulled over on the side of the road and exposed a film sheet based on a calculation from the known reflected luminosity from the moon. Click the link for the story, but it was an impressive feat.
A little on the zones…
The Zone System, is a rather simple photographic tool. This is an exposure range from 0 to 10. Zone 0 is complete black, so black there is no texture or definition. Zone 10 is pure white, so white that there is no texture of definition in it either. All photographic scenes fall somewhere in the range from 0 to 10, however they may not always fulfill all exposure zones (may not have pure black or white). An example would be an apple quality ranking from 0 to 10, every apple in the bunch is ranked but there need not be 0’s, 3’s, or 10’s but every apple is somewhere on that scale. A gray card is going to fall onto zone 5, because it is designed to reflect the average amount of light. A slightly more luminescent part of the scene would be zone 6, and a darker part would be zone 4. Adjusting exposure and contrast in the scene so that all zones are filled typically produces the best images. But applying creativity and artistic taste to the process such as using high-key (2-3 stops over exposure) may only use a few of the zones and still be considered ideal by the artist.
So, back to the light meter…
So lets get this topic on a roll then, the light meter. I will demonstrate how it lies.
The image to the left is the same as above, the light meter was set to the gray card, and a “proper” exposure was made. This and all following images were then set to the white balance based on the card in this image. All the color samples in this image are properly exposed.
Above: ISO: 1600 F/5.6 1/1600 sec below: ISO: 1600 F/5.6 1/1000 sec
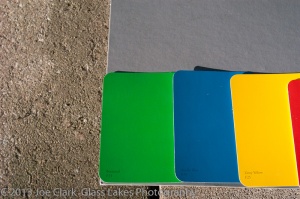
Now the image to the right, the camera was switched to aperture priority and the meter reading was taken from the green pain sample. Note the over-exposure from the previous photograph. The lighting is exactly the same, but the exposure is +3/4 stops. This is because green is a darker color, a cooler tone and reflects less light than the gray card. Therefore the meter dose its job and sets the exposure for the green as if it was looking at the grey card. When exposing a scene green can usually be considered to appear to the meter as -2/3 or -3/4. Therefore when working in a manual mode green can reliably be used to set the exposure in the scene, just make sure that the camera reads it as -2/3 or -3/4 underexposed. 
<– ISO: 1600 F/5.6 1/640 sec
This image was taken in the same manor as the last, but the light meter was pointed at the blue. Note that the shutter speed has yet again changed. It has exposed approximately 1 & 1/2 stops more than the control image.
Below: ISO: 1600 F/5.6 1/3000 sec
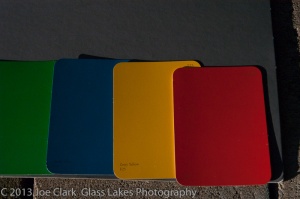
When the exposure was set to the yellow sample, the photo was horribly underexposed. Mind you the only thing which has changed is what color the light meter reading was taken from. In this instance the image is 1 stop underexposed.

<– ISO: 1600 F/5.6 1/1250 sec
This image to the left was exposed with a meter reading taken from the red paint sample. It is about 1/2 stop overexposed based on the gray card.
These are a few examples of how a light meter can produce undesirable results, The most prominent issues however are pure white objects such as snow and dresses, and purely black subjects. The light meter will try and expose so that their value is middle gray.
Their value…
That last sentence was fairly important, and warrants it’s own little section. When we are dealing with light meters, we are dealing only with the value that is being reflected from the subject, as in gray scale, as in luminosity. So when you are dealing with only the brightness of the subject colors do not matter. Colors only exist because of their physical makeup. They absorb all light, except for the frequencies that they reflect, that reflected light determines the color of the object. The amount of light determines the value. Where a brighter color is metered it confuses the light meter into thinking that it is too bright, so it averages the color down to the value of middle gray; this causes the image to be underexposed. We as humans then get frustrated by our cameras because we know, and want that color to be bright. This is where experience, patience, and an intimate familiarity with your equipment comes in handy. When photographing a bright subject, that you want to be bright simply overexpose the meter. Or, try using a gray card.
Some tricks and tools…
Gray cards, use them. Also, pull a meter reading from a gray card and photograph it, then put your hand into the frame and note the difference in exposure when pulling a meter reading from your hand. You can now use your hand as a rough calibration tool simply by keeping that offset in mind.
Shoot in manual mode, always. If you pull a gray card exposure reading, and set your camera to that you can run for a while with those settings. That situation (lighting angle, location, time of day, etc…) will be properly exposed. If you change the angle of light though, you will need to re-check that exposure.
F/11 rule: when shooting in direct sunlight with an aperture of f/11 your shutter speed will be 1/(ISO). Usually this works, and can come in handy.
When shooting in the open, try setting your exposure to the blue sky.
Green things, remember that when they indicate -2/3’s on your meter the exposure is approximately correct.
With digital cameras, it is better to underexpose a little bit then you have more wiggle-room in post production. Film cameras are better to overexpose a little bit, because of how the film captures data.
Photographic relativity…
Every lighting situation is relative. What is “bright” or “overexposed” is relative to what is “dark”, “underexposed”, and “neutral”. You as a photographer can take a photograph of a dark room and expose so that it is overexposed with blown-out highlights. A brightly lit beach can be photographed to appear dark. The contrast from light to dark is all relative to exposure, lighting, and post capture processing. An image partially covered in shadow, where do you place the gray card? What lighting do you want to portray as neutral? Well, that all depends on you. What do you want to highlight? What do you want to show? Your the one who needs to figure that all out!
Gadgetry!
Newer cameras are getting smarter with their light metering. Computer assisted scene recognition software is allowing the meter to recognize sunsets, back-lit portraits, and a variety of other situations. This is a wonderful thing for point and shoots, soccer-moms, family vacations, and what not. This helps, but also makes it harder to outsmart the light meter. The more knowledge and control that you have over your camera, the better photos you will be able to capture. Automatic mode is the devil, plane and simple. If allowed to fester it will be the death of the photographer, and the art of photography.
So…
Get out there, shoot something! Buy a gray card and experiment with it a little bit. Buy some books and read them, here try these (link goes to a set of 3 books, “The Camera”, “The Print”, and “The Negative”)
Remember, be smarter than the light meter. It usually takes a lot of effort to be, trust me on that!
Also, and always… Turn the camera to manual mode! The less automatic settings you use that happier you will be.
Like it? Love it?
Then follow my blog!
Want more???
Like me on Facebook!
Really like it? Visit my gallery, if you would like a print, then feel free to buy one!
Now, go shoot!
-JC
Leave A Comment